Thursday, December 22, 2011

Preorder Element Tree Traversal

Elements differ from other objects in a FrameMaker document in that they are organized not into a list but into a tree. The tree structure is exactly that you would see in the document's Structure View window.

Typically, working with elements means starting with the highest level element in the structured flow, the root element, and visiting each of the elements in the tree in a predictable order.

The algorithm described below uses a preorder traversal which visits the example element tree shown below in the order marked.


The following script traverses the element tree using a recursive algorithm. The walkTree() function starts at the root (or whatever node is passed in). It  gets that node's children starting with the first child. It is obtained using the element property FirstChildElement.

After processing that element, walkTree() calls itself this time passing in the child element. When that branch of the tree is processed, it continues on seeking any sibling elements using the element property NextSiblingElement.

NOTE: While not strictly necessary, the script keeps track of the element count to help make the association with the element numbers shown in the example above.

// Determines associated element definition name
function getElementName(elem) {
    var elemDef, name = null;

    elemDef = elem.ElementDef;
    if (elemDef.ObjectValid()) {
        name = elemDef.Name;
    }
    return name;
}

//Recursively traverses element tree in preorder fashion
function walkTree(elem, count) {
    var child, name;

    name = getElementName(elem);
    Console(count + ":  " + name);
    child = elem.FirstChildElement; //get first child if any
    while (child.ObjectValid()) {
        count = count + 1; //upate the element count to reflect element found
        count = walkTree(child, count); //traverse subtree with child root
        child = child.NextSiblingElement; //get the siblings
    }
    return count;
 }

var doc, flow, root;

doc = app.ActiveDoc;
flow = doc.MainFlowInDoc;
root = flow.HighestLevelElement;
if (root.ObjectValid()) {
    walkTree(root, 1);
}

The script output appears in the FrameMaker console and is shown here:


Tuesday, December 20, 2011

Determing What Element is Selected (Part 2)

This post looks at the same element selections used in the previous post but this time, it is the end of the element selection that is of interest. Adapting getElementSelectionStart() is straight-forward as shown here:

function getElementSelectionEnd(doc) {
    var eLoc, eRange, locInfo;
    eRange = doc.ElementSelection;
    locInfo = {
        'parent' : eRange.end.parent,
        'child' : eRange.end.child,
        'offset' : eRange.end.offset
    };
    return locInfo;
}

In the case where the root element is selected, the parent element end is null and the child is null and the offset is 0. This makes sense as selecting the root element is equivalent to selecting the whole flow. There are no elements beyond that point.


If an element other than the root element is selected and that element has no sibling following, the end child is null because its location is just beyond the last character in the selected element. The parent is the parent of the selected element.

In the case where the title element is selected there is a child element at the end of the selection as title has a "younger" sibling prolog.


This third example has an insertion point between the "o" and the "t" in "Motor" in the first document paragraph. In this case, the end parent element is p (the paragraph element), and there is no child element. The offset from the start of p is 2. This is exactly the same as was the case with the start element location as with an insertion point, as with an insertion point the starting and ending locations are the exactly same.


Monday, December 19, 2011

Determining What Element is Selected (Part 1)

Element selections are a similar to text selections in some ways but differ in others.

Use the document property ElementSelection to get the current element selection.

Just as text selections consist of a text range with beginning and ending text locations, element selections are an element range with beginning and ending element locations.

The difference between the two emerges when you look at the element locations that define the starting and ending points for an element selection. Unlike a text location which is typically a paragraph and an offset from the start of that paragraph, an element location consists of:
  • A parent element
  • A child element
  • An offset which is relative to the containing element.
The following script demonstrates how to work with the beginning of an element selection. It can also be used as a tool for understanding the meaning of parent and child element in this context.


//Returns the element definition name
function getElementName(elem) {
    var elemDef, name = null;

    elemDef = elem.ElementDef;
    if (elemDef.ObjectValid()) {
        name = elemDef.Name;
    }
    return name;
}

//Returns location information for the current element selection
function getElementSelectionStart(doc) {
    var eLoc, eRange, locInfo;
    eRange = doc.ElementSelection;
    locInfo = {
        'parent' : eRange.beg.parent,
        'child' : eRange.beg.child,
        'offset' : eRange.beg.offset
    };
    return locInfo;
}

var doc, elem, pName = null, cName = null, locInfo;
doc = app.ActiveDoc;

locInfo = getElementSelectionStart(doc);

if (locInfo.parent.ObjectValid()) {
    pName = getElementName(locInfo.parent);
}
if (locInfo.child.ObjectValid()) {
    cName = getElementName(locInfo.child);
}
Alert("Parent is " + pName + ", child is " + cName + " and offset is " + locInfo.offset,
    Constants.FF_ALERT_CONTINUE_NOTE);

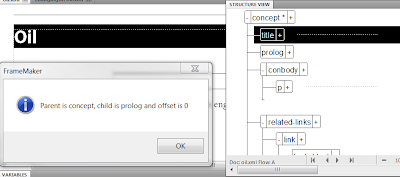
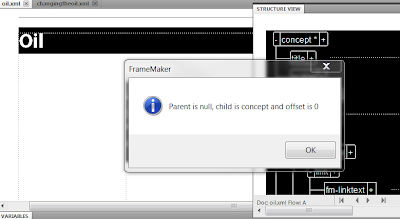
The first two test shown deal with the case where an entire element is selected. In these cases, the offset from the start of the element is always 0.

In the case where the root element is selected, the parent element is null and the child is the root element:


If an element other than the root element is selected, the child is the selected element and the parent is the parent of that child element.


This final example has an insertion point between the "o" and the "t" in "Motor" in the first document paragraph. In this case, the parent element is p (the paragraph element), and there is no child element. The offset from the start of p is 2.


Saturday, December 17, 2011

Getting an Element's Definition Name

When working with elements, it can be important to know an element's definition name. If you start with an element, you need to:
  1. Get the associated element definition.
  2. Get the definition name.
NOTE: A FrameMaker flow's element tree includes text nodes that do not have associated definitions and therefore have no name.

The following script displays the definition name of the highest level element in the main flow.

NOTE: The name returned is that in the EDD rather than in your DTD or schema.

function getElementName(elem) {
    var elemDef, name = null;

    elemDef = elem.ElementDef;
    if (elemDef.ObjectValid()) {
        name = elemDef.Name;
    }
    return name;
}

var doc, flow, root, name;

doc = app.ActiveDoc;
flow = doc.MainFlowInDoc;
root = flow.HighestLevelElement;

if (root.ObjectValid()) {
    name = getElementName(root);
    if (name !== null) {
        Alert(name, Constants.FF_ALERT_CONTINUE_NOTE);
    } else {
        Alert("Text node", Constants.FF_ALERT_CONTINUE_NOTE);
    }
}


Friday, December 16, 2011

Determining if a Document is Structured

While it is common to speak of FrameMaker documents as having structure, only flows can be structured. In short, a FrameMaker document has structure if any of its flows are structured.

Typically, FrameMaker documents have a single structured flow and that flow is the main flow. (There can be special cases where it is helpful to have multiple structured flows but I am not going to address that possibility at this time.)
 
In the ordinary case, if you want to know if a document has structure, you simply need to get the main flow object and then determine if it has a highest level element.

The following script determines whether or not the main flow in the active document is structured.

NOTE: A document might have an element catalog but if its main flow lacks element tagging, this script considers it unstructured.

var doc, flow, root;

doc = app.ActiveDoc;
flow = doc.MainFlowInDoc;
root = flow.HighestLevelElement;

if (root.ObjectValid()) {
    Alert("Document is structured.", Constants.FF_ALERT_CONTINUE_NOTE);
} else {
    Alert("Document is unstructured.", Constants.FF_ALERT_CONTINUE_NOTE);
}

The following example uses the built-in Harvard outline structured template.


Structured FrameMaker: The Big Picture

Structure in a FrameMaker document is, in effect, an overlay of information. One can choose to work with a structured document as if there was no structure. In other words, you can work with paragraphs, tables, markers, and any other document content without regard to the fact that these may be wrapped in elements.

If, however, your goal is to manipulate XML content, you need to work with elements and their attributes and, possibly, element definitions. This means working with a new set of objects.

If you are working strictly with document content, you are working with:
  • Element
  • Attributes
  • Attribute
If you want to alter or, more likely, query the Element Definition Document (EDD), you are working with:
  • ElementDef
  • AttributeDefs
  • AttributeDef
If you are working with attribute expressions, you are working with:
  • AttrCondExpr
If you need to manage the element catalog, you are working with: 
  • ElementCatalogEntry
  • ElementCatalogEntries

If you want to manage text using elements rather than paragraphs, you are working not with TextLoc and TextRange but:
  • ElementLoc
  • ElementRange


Wednesday, December 14, 2011

Making a Selection in a Table

Table selections are powerful because they make it possible to use clipboard operations on a selected table region.

Table selections must be rectangular. Table selections work off of row and column numbers rather than row objects and column numbers as you might first expect.

Row numbering is from top to bottom with the first row numbered 0.
Column numbering is from left to right with the first column numbered 0.

The following script selects the first column in the currently selected table. Note the need to count the number of rows in the table before making the selection.

function countTableRows(table) {
    var count = 0, row;
    row = table.FirstRowInTbl;
    while (row.ObjectValid()) {
        count = count + 1;
        row = row.NextRowInTbl;
    }
    return count;
}

function selectLeftMostColumn(table) {
    var rowCount;
    rowCount = countTableRows(table);
    if (table.ObjectValid()) {
        table.MakeTblSelection(0, rowCount - 1, 0, 0);
    }
}

var doc, table;
doc = app.ActiveDoc;
table = doc.SelectedTbl;
selectLeftMostColumn(table);


Tuesday, December 13, 2011

Unstraddling Table Cells

Unstraddling table cells is, in some respects, the inverse of straddling table cells. It does remove the straddle but cell content originally dispersed between the straddled cells remains in the cell that "anchored" the straddle even after the original cells are restored.

The following code is identical to that shown in the previous post save for the addition of a single line:
cell.UnStraddleCells(2, 3);

var doc, table, row, cell;

doc = app.ActiveDoc;
table = doc.SelectedTbl;
if (table.ObjectValid()) {
    row = table.FirstRowInTbl;
    row = row.NextRowInTbl; //second row
    if (row.ObjectValid()) {
        cell = row.FirstCellInRow; //first cell
        cell = cell.NextCellInRow; // second cell
        if (cell.ObjectValid()) {
            cell.StraddleCells(2, 3); // create the straddle
            cell.UnStraddleCells(2, 3); // remove the straddle
        }
    }
}

Here is a table before the script is run:
Here is the same table after the second cell in the second row is straddled and then unstraddled.

Saturday, December 10, 2011

Straddling Table Cells

Table cells are said to be straddled if a rectangular group of cells is combined to form a single cell. When defining a straddle, you must identify the leftmost and uppermost cell and determine how many rows and columns are to be straddled.

Straddles are determined by a number of  cells to the right and below a specified cell. The FDK model is shown below with cellId referring to the second cell in the second row. 

F_ApiStraddleCells(docId, cellId, 2, 3);


Here is the ExtendScript code and the result of straddling the second cell in the second table row.

var doc, table, row, cell;

doc = app.ActiveDoc;
table = doc.SelectedTbl;
if (table.ObjectValid()) {
    row = table.FirstRowInTbl;
    row = row.NextRowInTbl; //second row
    if (row.ObjectValid()) {
        cell = row.FirstCellInRow; //first cell
        cell = cell.NextCellInRow; // second cell
        if (cell.ObjectValid()) {
            cell.StraddleCells(2, 3); // 2 down, 3 across
        }
    }
}

WARNING: If this table had a header, the first row would be a header row. So don't get confused when counting rows in order to do a straddle. Header cells cannot be straddled with body cells.

Friday, December 9, 2011

Getting Table Cells Column by Column

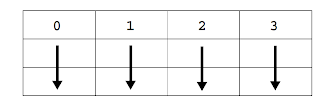
Traversing a table's cells column by column is a little tricky due to the fact that there is no column object. The following algorithm does the job:
  1. Get the first row in the table using the Tbl property FirstRowInTbl.
  2. Get the first cell in that row using the Row property FirstCellInRow.
  3. While there are additional cells in the column, get the next cell in that column using the Cell property CellBelowInCol.
  4. While there are additional cells in the first row, get the next cell in that row using the NextCellInRow property. 
  5. Go to step 3.
This cell traversal pattern is illustrated below.
The following script traverses the selected table using this algorithm.

var doc, table, row, topRowCell, cell, cellNum = 0;

doc = app.ActiveDoc;
table = doc.SelectedTbl;
row = table.FirstRowInTbl;
if (row.ObjectValid()) { //get first row
    topRowCell = row.FirstCellInRow;
    while (topRowCell.ObjectValid()) {//traverse cells in first row
        cell = topRowCell;
        while (cell.ObjectValid()) { //traverse cells in column
            cellNum = cellNum + 1;
            var tLoc = new TextLoc();  //create text location object
            tLoc.obj = cell; //make it a cell
            tLoc.offset = 0; // insert at the start of the cell
            doc.AddText(tLoc, "Cell "  + cellNum);
            cell = cell.CellBelowInCol;
        }
        topRowCell = topRowCell.NextCellInRow;
        cell = topRowCell;
    }
}

An example of the output produced by this script is shown below.


Thursday, December 8, 2011

Getting Table Cells Row by Row

Once you have a table identifier, you can access each of the cells within that table. This post focuses on accessing cells from left to right and top to bottom.

To do so:
  1. Get the first row in the table using the Tbl property FirstRowInTbl.
  2. Get the first cell in that row using the Row property FirstCellInRow.
  3. While there are additional cells, get each using the Cell property NextCellInRow.
  4. While there are additional rows, get each using the Row property NextRowInTbl.
Here is a script that does just that and writes to each cell in the order visited.

var doc, table, row, cell, cellNum = 0;

doc = app.ActiveDoc;
table = doc.SelectedTbl;
row = table.FirstRowInTbl;
while (row.ObjectValid()) { //traverse rows
    cell = row.FirstCellInRow;
    while (cell.ObjectValid()) { //traverse cells in row
        cellNum++;
        var tLoc = new TextLoc();  //create text location object
        tLoc.obj = cell; //make it a cell
        tLoc.offset = 0; // insert at the start of the cell
        doc.AddText(tLoc, "Cell "  + cellNum);
        cell = cell.NextCellInRow;
    }
    row = row.NextRowInTbl;
}

Note: The first row in a table can be a header row (as shown) or a body row if no header exists.

Monday, December 5, 2011

Adding Columns to a Table

Table columns differ from table rows because rows are object while columns are not. When adding a column you must specify the column number from which to start adding, the direction of the addition, and the number of coumns to add.

Columns are numbered from left to right with the first column being column 0.


The direction is either FV_Left or FV_Right.

The following script adds three columns after the second column in the selected table.

NOTE: A table is selected if any of its cells are selected or the insertion point is in any of its cells. 

var doc, table;

doc = app.ActiveDoc;
table = doc.SelectedTbl;
table.AddCols (1, Constants.FV_Right, 3);

Before running script


After running script

Sunday, December 4, 2011

Adding Rows to a Table

Adding rows to a table requires that you know the identifier of the table and that of the row you want to add before or after. You then specify the direction you want to add in and the number of rows to add.

You can specify:
  • Above (FV_Above)
  • Below  (FV_Below)
  • To the Footer (FV_Footing)
  • To the Header (FV_Heading)
  • At the bottom of existing body rows (FV_Body)

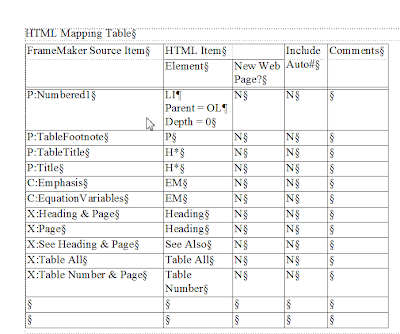
The following example adds two rows below the last body row in the table. In the case of the Portrait template, this turns out to be the bottom of the HTML Mapping Table on the third reference page and not the first table on the first body page. This reflects the fact that the script uses FirstTblInDoc, an unordered list.


NOTE: To get tables in flow order use GetText() with the flag FTI_TblAnchor.

NOTE: Rows are accessed via an ordered list. They can be navigated top to bottom (FirstRowInTbl, then NextRowInTbl) or bottom to top (LastRowInTbl, then PrevRowInTbl).

doc = app.ActiveDoc;
table = doc.FirstTblInDoc;
row = table.LastRowInTbl;    
row.AddRows(Constants.FV_Below, 2);     


Saturday, December 3, 2011

Creating a Table

Adding a table is a straight-forward task. You need to know the name of an existing table format, how many rows, columns, header rows, and footer rows to all and the location in text where the table is to be added.

The example below adds a table at the start of the current selection. It uses a table format found in the default Portrait template.

var doc, tRange, table;

doc = app.ActiveDoc;
tRange = doc.TextSelection;
table = doc.NewTable("Format A", 3, //number of rows
                                 2, //number of columns
                                 1,  //number of header rows
                                 0,  //number of footer rows
                                 tRange.beg);


Thursday, December 1, 2011

Tables

Tables are represented by the Tbl object. They consist of one or more Row objects with each row having one or more Cell objects.

NOTE: Table cells are a special type of text frame. They can contain text and almost anything that can be inserted into text with the exception that tables cannot be inserted directly into table cells. You can add a table inside a table cell by placing an anchored frame within the cell, a text frame within that anchored frame and then inserting the table.

Tables have a large number of the properties that reflect the choices a user might make table design dialog box.

There are two ways to find tables:
  • If you want all tables in any order, use the list of all tables in a document. Use the  FirstTblInDoc document property, NextTblInDoc table property.
  • If you want tables in flow order, use GetText() using the flag Constants.FTI_TblAnchor.