Sunday, January 22, 2012

Saving a document with user interaction

If your script makes changes to a document, you will want to save that file. This post, as will the next several posts, discuss the various ways you can do so.

From a scripting point of view, there are two possible ways to save a file. The first is deemed "simple" and the second is more complex to call and customizable. (In the FDK world, this option was deemed 'script-able.') The different between the two lies in the degree of configuration offered.

Simple operations use default settings but do offer one big choice. They allow you to choose whether you want to do the save operation with or without user interaction.

If you are doing a batch operation, you are not going to want user interaction. If, however, you are creating a command a user might call that needs user input, allowing a user to make choices regarding a save in the exact same way as he or she might had they invoked the command form the menu can be useful.

The following script invokes the save dialog using a script.

var doc, name;

doc = app.ActiveDoc;
name = doc.Name;
doc.SimpleSave(name, true); //true signifies user directed


Here is what happens when I saved a file using this script. It is the equivalent o the user choosing File>Save.

Wednesday, January 11, 2012

Rearranging the Tree of Elements

You can use the Cut, Copy, Paste methods to move selected elements around in the tree. There are, however, some special cases where you can take advantage of built-in tree manipulation functions.
  • Use the document method PromoteElement() to make the selected element the sibling of its former parent.
  • Use the document method DemoteElement() to make the selected element the child of its preceding sibling.

The following simple script promotes the selected element. You could easily modify it to demote an element.

var doc;

doc = app.ActiveDoc;
doc.PromoteElement();
if (FA_errno !== 0) {
    Alert(FA_errno + '');
}

The script checks for an error code:
  • Constants.FE_WrongProduct (-60) signifies that the product interface is not set to Structured FrameMaker .
  • Constants.FE_BadDocId (-2) indicates a problem with the document identifier.
  • Constants.FE_BadSelectionForOperation (-59) indicates that the action requested could not be taken on the selected element. For example, you cannot promote the root element or its children.

Here is the before and after that results from promoting the p element.
Before element promotion
After element promotion
This promote operation happens to make the structure tree invalid but the operation itself is sound.

Attempting to promote the root element produces the following error code message Constants.FE_BadSelectionForOperation (-59) as displayed by the script.


Sunday, January 8, 2012

Text Nodes

Text nodes appear in the element tree when a container element has multiple children some of which are containers for text and some of which are just a text string.

Consider the case of an element, p, that allows text (<TEXT>) and other elements as described in the EDD:


I have made a small modification to oil.xml to illustrate this point. The word "every" is italicized by wrapping it in the element i. Before this change, the p element had no children. Now it has three. The first and the last of these are text nodes as illustrated below.


The function getElementName() uses the element property ElementDef to find the definition object and then the name property to get the name string.

function getElementName(elem) {
    var elemDef, name = null;

    elemDef = elem.ElementDef;
    if (elemDef.ObjectValid()) {
        name = elemDef.Name;
    }
    return name;
}

If an element definition is NULL, that element is a text node. Armed with this knowledge, the displayAttrs() function used in a previous post can be improved.

//writes element name and list of attributes to the console
function  displayAttrs(elem) {
    var i, name, aName, attrs;
   
    name = getElementName(elem);
    if (name != null) {
        Console(name);
        attrs = elem.GetAttributes();
        for (i = 0; i < attrs.len; i++) {
            aName = attrs[i].name;
            Console( "     " + aName);      
        }
    } else {
        Console("Selected element is a text node");
     }
}

Here a text node is selected:

The output when displayAttrs() is called on the selected text node is shown here:


Element Navigation Schematic

The following illustration shows the possible  element properties for use in navigating the element tree in a structured document. All properties, with the exception of HighestLevelElement are those of the element shown in black.


Getting Attribute Names

Once you have an element's object, you can examine its attributes. This script lists the attributes of the currently selected element in the FrameMaker console.

The script uses the GetAttributes() method and then iterates over the attribute list obtained, each time getting the name and writing that value to the FrameMaker Console. (The extra space prior to the name is used solely for readability purposes.)

// determines associated element definition name
function getElementName(elem) {
    var elemDef, name = null;

    elemDef = elem.ElementDef;
    if (elemDef.ObjectValid()) {
        name = elemDef.Name;
    }
    return name;
}

//writes element name and list of attributes to the console
function  displayAttrs(elem) {
    var i, name, aName, attrs;
   
    name = getElementName(elem);
    Console(name);
    attrs = elem.GetAttributes();
    for (i = 0; i < attrs.len; i++) {
        aName = attrs[i].name;
        Console( "     " + aName);      
    }
}
var doc, elem, eLoc, eRange;

doc = app.ActiveDoc;
eRange = doc.ElementSelection;
eLoc = eRange.beg;
elem = eLoc.child;
if (elem.ObjectValid()) {
    displayAttrs(elem)
} else {
    Alert("No element was selected.",
       
Constants.FF_ALERT_CONTINUE_NOTE); 
}

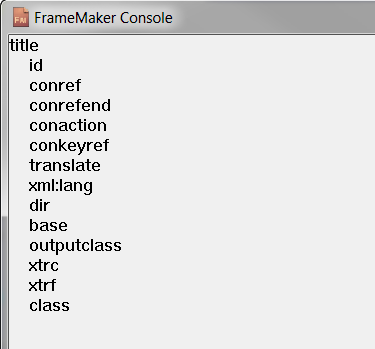
Consider the test case where the oil.xml document's title element is selected.

The script produces the following output:


Monday, January 2, 2012

Getting an Element's Text

Once you know how to work with text, working with an element's text is straight-forward. The following function calls the element GetText() method asking for strings. It then iterates over any text items found and concatenates the values found into a single string.

The getElementText() function is shown below. An example of its use will be provided in my next post.

function getElementText(elem) {
    var  tItems, i, text = "";

    tItems = elem.GetText(Constants.FTI_String);
    for (i = 0; i < tItems.len; i += 1) {
        switch (tItems[i].dataType) {
        case Constants.FTI_String:
            text =  text + tItems[i].sdata;
            break;
        }
    }
    return text;
}

Sunday, January 1, 2012

Collapsing Elements in the Structure View

Once you can access an element's object, you can affect how it is displayed in the structure view.

By updating the walkTree() function with a single line of code, your script can collapse, as is the case here, or uncollapse elements in the tree.

function walkTree(elem, count) {
    var child, name;

    name = getElementName(elem);
    elem.ElementIsCollapsed = true; // collapse element
    Console(count + ":  " + name);
    child = elem.FirstChildElement; //get first child if any
    while (child.ObjectValid()) {
        count = count + 1; //upate element count
        count = walkTree(child, count); //traverse subtree with child root
        child = child.NextSiblingElement; //get the siblings
    }
    return count;
 }

Just be sure to redisplay the document when you are done to make your changes visible to the user.

doc.Redisplay();

Before the script was run, the structure view appears as follows:

After the running the script, it appears as shown here:


Just to verify that all elements in the tree were collapsed, I manually uncollapsed the root element to reveal that the script works as expected.