Thursday, December 22, 2011

Preorder Element Tree Traversal

Elements differ from other objects in a FrameMaker document in that they are organized not into a list but into a tree. The tree structure is exactly that you would see in the document's Structure View window.

Typically, working with elements means starting with the highest level element in the structured flow, the root element, and visiting each of the elements in the tree in a predictable order.

The algorithm described below uses a preorder traversal which visits the example element tree shown below in the order marked.


The following script traverses the element tree using a recursive algorithm. The walkTree() function starts at the root (or whatever node is passed in). It  gets that node's children starting with the first child. It is obtained using the element property FirstChildElement.

After processing that element, walkTree() calls itself this time passing in the child element. When that branch of the tree is processed, it continues on seeking any sibling elements using the element property NextSiblingElement.

NOTE: While not strictly necessary, the script keeps track of the element count to help make the association with the element numbers shown in the example above.

// Determines associated element definition name
function getElementName(elem) {
    var elemDef, name = null;

    elemDef = elem.ElementDef;
    if (elemDef.ObjectValid()) {
        name = elemDef.Name;
    }
    return name;
}

//Recursively traverses element tree in preorder fashion
function walkTree(elem, count) {
    var child, name;

    name = getElementName(elem);
    Console(count + ":  " + name);
    child = elem.FirstChildElement; //get first child if any
    while (child.ObjectValid()) {
        count = count + 1; //upate the element count to reflect element found
        count = walkTree(child, count); //traverse subtree with child root
        child = child.NextSiblingElement; //get the siblings
    }
    return count;
 }

var doc, flow, root;

doc = app.ActiveDoc;
flow = doc.MainFlowInDoc;
root = flow.HighestLevelElement;
if (root.ObjectValid()) {
    walkTree(root, 1);
}

The script output appears in the FrameMaker console and is shown here:


Tuesday, December 20, 2011

Determing What Element is Selected (Part 2)

This post looks at the same element selections used in the previous post but this time, it is the end of the element selection that is of interest. Adapting getElementSelectionStart() is straight-forward as shown here:

function getElementSelectionEnd(doc) {
    var eLoc, eRange, locInfo;
    eRange = doc.ElementSelection;
    locInfo = {
        'parent' : eRange.end.parent,
        'child' : eRange.end.child,
        'offset' : eRange.end.offset
    };
    return locInfo;
}

In the case where the root element is selected, the parent element end is null and the child is null and the offset is 0. This makes sense as selecting the root element is equivalent to selecting the whole flow. There are no elements beyond that point.


If an element other than the root element is selected and that element has no sibling following, the end child is null because its location is just beyond the last character in the selected element. The parent is the parent of the selected element.

In the case where the title element is selected there is a child element at the end of the selection as title has a "younger" sibling prolog.


This third example has an insertion point between the "o" and the "t" in "Motor" in the first document paragraph. In this case, the end parent element is p (the paragraph element), and there is no child element. The offset from the start of p is 2. This is exactly the same as was the case with the start element location as with an insertion point, as with an insertion point the starting and ending locations are the exactly same.


Monday, December 19, 2011

Determining What Element is Selected (Part 1)

Element selections are a similar to text selections in some ways but differ in others.

Use the document property ElementSelection to get the current element selection.

Just as text selections consist of a text range with beginning and ending text locations, element selections are an element range with beginning and ending element locations.

The difference between the two emerges when you look at the element locations that define the starting and ending points for an element selection. Unlike a text location which is typically a paragraph and an offset from the start of that paragraph, an element location consists of:
  • A parent element
  • A child element
  • An offset which is relative to the containing element.
The following script demonstrates how to work with the beginning of an element selection. It can also be used as a tool for understanding the meaning of parent and child element in this context.


//Returns the element definition name
function getElementName(elem) {
    var elemDef, name = null;

    elemDef = elem.ElementDef;
    if (elemDef.ObjectValid()) {
        name = elemDef.Name;
    }
    return name;
}

//Returns location information for the current element selection
function getElementSelectionStart(doc) {
    var eLoc, eRange, locInfo;
    eRange = doc.ElementSelection;
    locInfo = {
        'parent' : eRange.beg.parent,
        'child' : eRange.beg.child,
        'offset' : eRange.beg.offset
    };
    return locInfo;
}

var doc, elem, pName = null, cName = null, locInfo;
doc = app.ActiveDoc;

locInfo = getElementSelectionStart(doc);

if (locInfo.parent.ObjectValid()) {
    pName = getElementName(locInfo.parent);
}
if (locInfo.child.ObjectValid()) {
    cName = getElementName(locInfo.child);
}
Alert("Parent is " + pName + ", child is " + cName + " and offset is " + locInfo.offset,
    Constants.FF_ALERT_CONTINUE_NOTE);

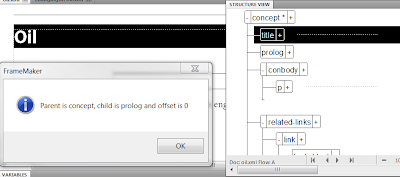
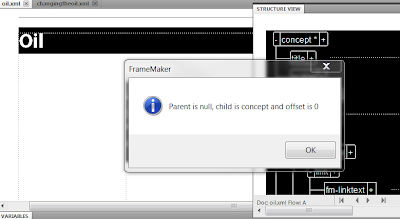
The first two test shown deal with the case where an entire element is selected. In these cases, the offset from the start of the element is always 0.

In the case where the root element is selected, the parent element is null and the child is the root element:


If an element other than the root element is selected, the child is the selected element and the parent is the parent of that child element.


This final example has an insertion point between the "o" and the "t" in "Motor" in the first document paragraph. In this case, the parent element is p (the paragraph element), and there is no child element. The offset from the start of p is 2.


Saturday, December 17, 2011

Getting an Element's Definition Name

When working with elements, it can be important to know an element's definition name. If you start with an element, you need to:
  1. Get the associated element definition.
  2. Get the definition name.
NOTE: A FrameMaker flow's element tree includes text nodes that do not have associated definitions and therefore have no name.

The following script displays the definition name of the highest level element in the main flow.

NOTE: The name returned is that in the EDD rather than in your DTD or schema.

function getElementName(elem) {
    var elemDef, name = null;

    elemDef = elem.ElementDef;
    if (elemDef.ObjectValid()) {
        name = elemDef.Name;
    }
    return name;
}

var doc, flow, root, name;

doc = app.ActiveDoc;
flow = doc.MainFlowInDoc;
root = flow.HighestLevelElement;

if (root.ObjectValid()) {
    name = getElementName(root);
    if (name !== null) {
        Alert(name, Constants.FF_ALERT_CONTINUE_NOTE);
    } else {
        Alert("Text node", Constants.FF_ALERT_CONTINUE_NOTE);
    }
}


Friday, December 16, 2011

Determining if a Document is Structured

While it is common to speak of FrameMaker documents as having structure, only flows can be structured. In short, a FrameMaker document has structure if any of its flows are structured.

Typically, FrameMaker documents have a single structured flow and that flow is the main flow. (There can be special cases where it is helpful to have multiple structured flows but I am not going to address that possibility at this time.)
 
In the ordinary case, if you want to know if a document has structure, you simply need to get the main flow object and then determine if it has a highest level element.

The following script determines whether or not the main flow in the active document is structured.

NOTE: A document might have an element catalog but if its main flow lacks element tagging, this script considers it unstructured.

var doc, flow, root;

doc = app.ActiveDoc;
flow = doc.MainFlowInDoc;
root = flow.HighestLevelElement;

if (root.ObjectValid()) {
    Alert("Document is structured.", Constants.FF_ALERT_CONTINUE_NOTE);
} else {
    Alert("Document is unstructured.", Constants.FF_ALERT_CONTINUE_NOTE);
}

The following example uses the built-in Harvard outline structured template.


Structured FrameMaker: The Big Picture

Structure in a FrameMaker document is, in effect, an overlay of information. One can choose to work with a structured document as if there was no structure. In other words, you can work with paragraphs, tables, markers, and any other document content without regard to the fact that these may be wrapped in elements.

If, however, your goal is to manipulate XML content, you need to work with elements and their attributes and, possibly, element definitions. This means working with a new set of objects.

If you are working strictly with document content, you are working with:
  • Element
  • Attributes
  • Attribute
If you want to alter or, more likely, query the Element Definition Document (EDD), you are working with:
  • ElementDef
  • AttributeDefs
  • AttributeDef
If you are working with attribute expressions, you are working with:
  • AttrCondExpr
If you need to manage the element catalog, you are working with: 
  • ElementCatalogEntry
  • ElementCatalogEntries

If you want to manage text using elements rather than paragraphs, you are working not with TextLoc and TextRange but:
  • ElementLoc
  • ElementRange


Wednesday, December 14, 2011

Making a Selection in a Table

Table selections are powerful because they make it possible to use clipboard operations on a selected table region.

Table selections must be rectangular. Table selections work off of row and column numbers rather than row objects and column numbers as you might first expect.

Row numbering is from top to bottom with the first row numbered 0.
Column numbering is from left to right with the first column numbered 0.

The following script selects the first column in the currently selected table. Note the need to count the number of rows in the table before making the selection.

function countTableRows(table) {
    var count = 0, row;
    row = table.FirstRowInTbl;
    while (row.ObjectValid()) {
        count = count + 1;
        row = row.NextRowInTbl;
    }
    return count;
}

function selectLeftMostColumn(table) {
    var rowCount;
    rowCount = countTableRows(table);
    if (table.ObjectValid()) {
        table.MakeTblSelection(0, rowCount - 1, 0, 0);
    }
}

var doc, table;
doc = app.ActiveDoc;
table = doc.SelectedTbl;
selectLeftMostColumn(table);


Tuesday, December 13, 2011

Unstraddling Table Cells

Unstraddling table cells is, in some respects, the inverse of straddling table cells. It does remove the straddle but cell content originally dispersed between the straddled cells remains in the cell that "anchored" the straddle even after the original cells are restored.

The following code is identical to that shown in the previous post save for the addition of a single line:
cell.UnStraddleCells(2, 3);

var doc, table, row, cell;

doc = app.ActiveDoc;
table = doc.SelectedTbl;
if (table.ObjectValid()) {
    row = table.FirstRowInTbl;
    row = row.NextRowInTbl; //second row
    if (row.ObjectValid()) {
        cell = row.FirstCellInRow; //first cell
        cell = cell.NextCellInRow; // second cell
        if (cell.ObjectValid()) {
            cell.StraddleCells(2, 3); // create the straddle
            cell.UnStraddleCells(2, 3); // remove the straddle
        }
    }
}

Here is a table before the script is run:
Here is the same table after the second cell in the second row is straddled and then unstraddled.

Saturday, December 10, 2011

Straddling Table Cells

Table cells are said to be straddled if a rectangular group of cells is combined to form a single cell. When defining a straddle, you must identify the leftmost and uppermost cell and determine how many rows and columns are to be straddled.

Straddles are determined by a number of  cells to the right and below a specified cell. The FDK model is shown below with cellId referring to the second cell in the second row. 

F_ApiStraddleCells(docId, cellId, 2, 3);


Here is the ExtendScript code and the result of straddling the second cell in the second table row.

var doc, table, row, cell;

doc = app.ActiveDoc;
table = doc.SelectedTbl;
if (table.ObjectValid()) {
    row = table.FirstRowInTbl;
    row = row.NextRowInTbl; //second row
    if (row.ObjectValid()) {
        cell = row.FirstCellInRow; //first cell
        cell = cell.NextCellInRow; // second cell
        if (cell.ObjectValid()) {
            cell.StraddleCells(2, 3); // 2 down, 3 across
        }
    }
}

WARNING: If this table had a header, the first row would be a header row. So don't get confused when counting rows in order to do a straddle. Header cells cannot be straddled with body cells.

Friday, December 9, 2011

Getting Table Cells Column by Column

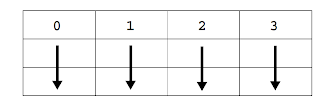
Traversing a table's cells column by column is a little tricky due to the fact that there is no column object. The following algorithm does the job:
  1. Get the first row in the table using the Tbl property FirstRowInTbl.
  2. Get the first cell in that row using the Row property FirstCellInRow.
  3. While there are additional cells in the column, get the next cell in that column using the Cell property CellBelowInCol.
  4. While there are additional cells in the first row, get the next cell in that row using the NextCellInRow property. 
  5. Go to step 3.
This cell traversal pattern is illustrated below.
The following script traverses the selected table using this algorithm.

var doc, table, row, topRowCell, cell, cellNum = 0;

doc = app.ActiveDoc;
table = doc.SelectedTbl;
row = table.FirstRowInTbl;
if (row.ObjectValid()) { //get first row
    topRowCell = row.FirstCellInRow;
    while (topRowCell.ObjectValid()) {//traverse cells in first row
        cell = topRowCell;
        while (cell.ObjectValid()) { //traverse cells in column
            cellNum = cellNum + 1;
            var tLoc = new TextLoc();  //create text location object
            tLoc.obj = cell; //make it a cell
            tLoc.offset = 0; // insert at the start of the cell
            doc.AddText(tLoc, "Cell "  + cellNum);
            cell = cell.CellBelowInCol;
        }
        topRowCell = topRowCell.NextCellInRow;
        cell = topRowCell;
    }
}

An example of the output produced by this script is shown below.


Thursday, December 8, 2011

Getting Table Cells Row by Row

Once you have a table identifier, you can access each of the cells within that table. This post focuses on accessing cells from left to right and top to bottom.

To do so:
  1. Get the first row in the table using the Tbl property FirstRowInTbl.
  2. Get the first cell in that row using the Row property FirstCellInRow.
  3. While there are additional cells, get each using the Cell property NextCellInRow.
  4. While there are additional rows, get each using the Row property NextRowInTbl.
Here is a script that does just that and writes to each cell in the order visited.

var doc, table, row, cell, cellNum = 0;

doc = app.ActiveDoc;
table = doc.SelectedTbl;
row = table.FirstRowInTbl;
while (row.ObjectValid()) { //traverse rows
    cell = row.FirstCellInRow;
    while (cell.ObjectValid()) { //traverse cells in row
        cellNum++;
        var tLoc = new TextLoc();  //create text location object
        tLoc.obj = cell; //make it a cell
        tLoc.offset = 0; // insert at the start of the cell
        doc.AddText(tLoc, "Cell "  + cellNum);
        cell = cell.NextCellInRow;
    }
    row = row.NextRowInTbl;
}

Note: The first row in a table can be a header row (as shown) or a body row if no header exists.

Monday, December 5, 2011

Adding Columns to a Table

Table columns differ from table rows because rows are object while columns are not. When adding a column you must specify the column number from which to start adding, the direction of the addition, and the number of coumns to add.

Columns are numbered from left to right with the first column being column 0.


The direction is either FV_Left or FV_Right.

The following script adds three columns after the second column in the selected table.

NOTE: A table is selected if any of its cells are selected or the insertion point is in any of its cells. 

var doc, table;

doc = app.ActiveDoc;
table = doc.SelectedTbl;
table.AddCols (1, Constants.FV_Right, 3);

Before running script


After running script

Sunday, December 4, 2011

Adding Rows to a Table

Adding rows to a table requires that you know the identifier of the table and that of the row you want to add before or after. You then specify the direction you want to add in and the number of rows to add.

You can specify:
  • Above (FV_Above)
  • Below  (FV_Below)
  • To the Footer (FV_Footing)
  • To the Header (FV_Heading)
  • At the bottom of existing body rows (FV_Body)

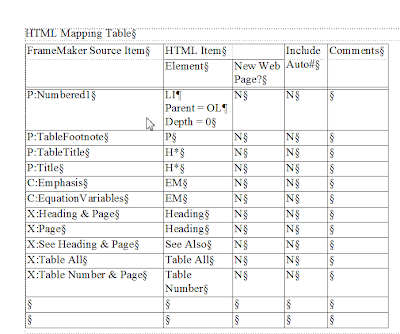
The following example adds two rows below the last body row in the table. In the case of the Portrait template, this turns out to be the bottom of the HTML Mapping Table on the third reference page and not the first table on the first body page. This reflects the fact that the script uses FirstTblInDoc, an unordered list.


NOTE: To get tables in flow order use GetText() with the flag FTI_TblAnchor.

NOTE: Rows are accessed via an ordered list. They can be navigated top to bottom (FirstRowInTbl, then NextRowInTbl) or bottom to top (LastRowInTbl, then PrevRowInTbl).

doc = app.ActiveDoc;
table = doc.FirstTblInDoc;
row = table.LastRowInTbl;    
row.AddRows(Constants.FV_Below, 2);     


Saturday, December 3, 2011

Creating a Table

Adding a table is a straight-forward task. You need to know the name of an existing table format, how many rows, columns, header rows, and footer rows to all and the location in text where the table is to be added.

The example below adds a table at the start of the current selection. It uses a table format found in the default Portrait template.

var doc, tRange, table;

doc = app.ActiveDoc;
tRange = doc.TextSelection;
table = doc.NewTable("Format A", 3, //number of rows
                                 2, //number of columns
                                 1,  //number of header rows
                                 0,  //number of footer rows
                                 tRange.beg);


Thursday, December 1, 2011

Tables

Tables are represented by the Tbl object. They consist of one or more Row objects with each row having one or more Cell objects.

NOTE: Table cells are a special type of text frame. They can contain text and almost anything that can be inserted into text with the exception that tables cannot be inserted directly into table cells. You can add a table inside a table cell by placing an anchored frame within the cell, a text frame within that anchored frame and then inserting the table.

Tables have a large number of the properties that reflect the choices a user might make table design dialog box.

There are two ways to find tables:
  • If you want all tables in any order, use the list of all tables in a document. Use the  FirstTblInDoc document property, NextTblInDoc table property.
  • If you want tables in flow order, use GetText() using the flag Constants.FTI_TblAnchor.


Wednesday, November 30, 2011

Determining an Object's Page

The script below works with the current selection. That selection can be an insertion point, a text range or a variety of objects including text frames, other frame types, graphic objects and equations.

It begins by determining the type of object selected. It handles, text selections, a selected table, or a selected graphic.

NOTE:  If there is a text selection that spans paragraphs, the beginning of the selection is used in determining the object chosen.

If there is an object selected, the script then determines its page frame. It uses the page frame to determine the actual page number and displays it using an alert.

The real work of the script is in determining the page frame. To do so it works its way up the object chain until it finds an unanchored frame whose frame parent is null. The function contains a while loop that terminates only when the object found is a frame with no frame parent. For each object type, it moves up the chain of objects. If the object found is:
  • A table, it uses the upper right most cell in the table.
  • A cell, paragraph or anchored frame, it moves up the chain to the object's text frame.
  • A text line, text frame, or a graphic shape, it moves up the chain to the object's frame parent.
The code is shown here followed by an example of its use.

function GetSelectedObject(doc) {
    var tRange, obj, type;
    obj =  null;
    tRange = doc.TextSelection;
    obj = tRange.beg.obj;
    if (!obj.ObjectValid()) {
        obj = doc.SelectedTbl;
        if (!obj.ObjectValid()) {
            obj = doc.FirstSelectedGraphicInDoc;
        }
    }
    return obj;
}

function FindPageFrame(doc, obj) {
    var frame, row, colNum, cell, objType;

    while (obj.ObjectValid()) {
        frame = obj;
        objType = obj.constructor.name;
        if (objType === "Tbl") {
            row = obj.TopRowSelection;
            colNum = row.RightColNum;
            cell = row.FirstCellInRow;
            obj = cell;
        }
        else if (objType === "Cell" || objType === "Pgf" ||
             objType === "AFrame") {
             obj = obj.InTextFrame;
         }
         else if (objType === "TextLine" ||  objType === "TextFrame" ||
                 objType === "UnanchoredFrame" || objType === "Arc" ||
                 objType === "Ellipse" || objType === "Group" ||
                 objType === "Inset" || objType === "Line" ||
                 objType === "Math" || objType === "Polygon" ||
                 objType === "Polyline" || objType === "Rectangle" ||
                 objType === "RoundRect") {
            obj = obj.FrameParent;
         }
    }//end while
    return frame;
}

var doc, frame, obj, page, pageNumStr;

doc = app.ActiveDoc;
obj = GetSelectedObject(doc);
if (obj.ObjectValid()) {
    frame = FindPageFrame(doc, obj);
    if (frame.ObjectValid()) {
        page = frame.PageFramePage;
        pageNumStr = page.PageNumString;
        Alert("Object is on page " + pageNumStr, Constants.FF_ALERT_CONTINUE_NOTE);
    }
}
else
{
        Alert("No selection",  Constants.FF_ALERT_CONTINUE_NOTE);
 }


Selection is a text line


Monday, November 28, 2011

Determining an Object's Type

If you find an object by navigating a list such that the lists of paragraphs, markers, pages, and the like, you know in advance what object type you will find. But what if you get an object because it represents, for example, the user selection? In such a case, there is uncertainty as to what you have found but to do anything with that found object, you need to definitively determine its object's type.

The FDK provides the function F_ApiGetObjectType() which returns the FO_ type of an object but there is no analog in ExtendScript. Your best option is to use the object’s constructor property name. (Thanks to Ian Proudfoot for this tip.)


The following script updates the find selection type script to determine the object type of the currently selected object, if any.

function GetSelectedObjectType(doc) {
    var tRange, obj, type;
 
    tRange = doc.TextSelection;
    obj = tRange.beg.obj;
    if (!obj.ObjectValid()) {
        obj = doc.SelectedTbl;
        if (!obj.ObjectValid()) {
            obj = doc.FirstSelectedGraphicInDoc;
        }
    }

    if (obj.ObjectValid()) {
        type = obj.constructor.name;
    }
    else {
        type = "None";
    }

    return type;
}

var doc = app.ActiveDoc;
Alert(GetSelectedObjectType(doc), Constants.FF_ALERT_CONTINUE_NOTE);


Wednesday, November 23, 2011

Working with Selections

My plan is to write a script that determines the page location of the current user selection. This means figuring out what, if anything, in the document of interest is selected.

This script makes use of three document properties:
  • TextSelection returns the text range for the current text selection.
  • SelectedTbl returns the identifier of the selected table.
  • FirstSelectedGraphicInDoc returns the identifier of the first in a list of selected graphics objects. NextSelectedGraphicsInDoc, a property of the first object found, takes you to the next object in the list. 
Some things to note:
  • If there is an insertion point or a selected text range within a table cell, that table is not selected. For a table to be selected, the entire table, the entire table title, or an entire cell within the table must be selected.
  • The list of selected graphics in a document is an unordered list. This means that there is no telling which of a list of selected graphics might be returned by FirstSelectedGraphicInDoc . It might be the one the user selected first but do not count on that fact.
//returns a string indicating the type of object currently selected
function GetSelectedObjectType(doc) {
    var tRange, obj;
    tRange = doc.TextSelection;
    obj = tRange.beg.obj;
    if (obj.ObjectValid()) {
        return "Text Selection";
    }
    obj = doc.SelectedTbl;
    if (obj.ObjectValid()) {
        return "Selected Table";
    }
    obj = doc.FirstSelectedGraphicInDoc;
    if (obj.ObjectValid()) {
        return "Selected Graphic";
    }
    return "No selection";
}

var doc = app.ActiveDoc;
Alert(GetSelectedObjectType(doc), Constants.FF_ALERT_CONTINUE_NOTE);


Tuesday, November 22, 2011

Things that Reside in Text Frames

The previous post discussed the fact that graphic objects have a FrameParent property that returns their containing frame. Objects that can appear in text have a similar property that returns their containing text frame. These objects are markers, cross references, variables, anchored frames, and text insets of various types
    While cross references, variables, and text insets contribute to the document content, markers do not. Anchored frames do not contribute to paragraph content although they can add considerable document content. For that reason, markers and anchored frames exist at a location in text while the other three have an associated text range that delineates the start and end of their content. Thus there are the following object/property pairings:
    • Markers and anchored frames have the TextLoc property that returns an offset from the start of the containing table cell or paragraph.
    • Cross references, variables, and the various text inset objects (Ti*) have the TextRange property that provides a starting and and ending text location.
    Once you know a text location or range, you can easily get the identifier of the paragraph or table cell that starts (or ends) the text location. Those objects have the InTextFrame property that takes you to the (graphic object) text frame.

    NOTE: Anchored frames have the InTextFrame property as well as the TextLoc property allowing you to go directly learn the idenfier of their text frame when desired.


    Monday, November 21, 2011

    Graphics and their FrameParent

    The page frame that holds all of a page's content is a special instance of a graphic object. But what exactly are graphic objects?

    In FrameMaker, anything that has handles when selected is a graphic object. This includes the following object types:
    • AFrame
      An anchored frame that is tied to a specific text location.
    • UnanchoredFrame
      A frame that is placed directly on the page.
    • Line, Arc, Rectangle, Ellipse, RoundRect, Polyline, Polygon
      The simple geometric shapes that can be created with the FrameMaker drawing tools
    • Group
      An invisible object that allows a set of other graphic objects in the same frame to be moved or otherwise managed as a set.
    • TextLine
      A line of text created with the FrameMaker drawing tools.
    • TextFrame
      Container for a text flow.
    • Inset
      An imported graphic or file that was imported into a FrameMaker document.
    • Math
      An equation created with the FrameMaker equation editor.
    All graphic objects appear within frames, whether anchored or unanchored. A graphic's FrameParent property provides the link to the containing frame. The page frame, as it has no containing frame has a FrameParent that is null.

    Sunday, November 20, 2011

    The Page Frame

    Pages object do not contain the text and graphics that appear on them. Instead, pages have a PageFrame property that specifies the identifier of the page frame that contains those objects. (Everything that prints in a FrameMaker document is within one page frame or another.)

    The page frame is an invisible unanchored frame whose dimensions match that of the page. A page frame has the object type FO_UnanchoredFrame. If you have a page object, you can get to the page frame using the PageFrame property. There is a corresponding property PageFramePage that takes you from the page frame back to the page.

    The following illustration shows this relationship. It uses FDK FP_ prefixes for property names as I have recycled it from some old FDK training materials. Drop them to get the corresponding ESTK names.  All page types have this property, not just body pages.


    These properties are important if you need to determine what page an object appears on or conversely what objects appear on a given page. I will go into these problems in more detail in my next several posts.

    Saturday, November 19, 2011

    Navigating by Page

    Moving through a document's pages is a straight-forward process. The first page, whether a body, master or reference, is a document property:
    • FirstBodyPageInDoc
    • FirstMasterPageInDoc
    • FirstRefPageInDoc
    As pages are ordered, you can also start at the end:
    • LastBodyPageInDoc
    • LastMasterPageInDoc
    • LastRefPageInDoc
    Each page has a PageNext and PagePrev property that allows you to move to the next page in the sequence. Remember that these are page properties.

    Once you locate the page of interest, you can make it the current page. The following script makes the first reference page the active page.

    var doc, firstRef;
    doc = app.ActiveDoc;
    firstRef = doc.FirstRefPageInDoc;
    doc.CurrentPage = firstRef;


    If you run this script on the Portrait template, the following page will appear on screen:


    Thursday, November 17, 2011

    Working with the Current Page

    You can easily locate a document's current page using the CurrentPage document property. The current page is the one that is currently displayed on the screen and not the one with the insertion point.

    Once you have the current page, you can access page number information:
    • PageNum is an integer indicating the position of the page within the document. The count starts at zero.
    • PageNumString is the number that appears in the page footer. It is defined by the variable building block <$curpagenum>.
    The script below defines two functions:
    • GetPageNumber() returns the relative page number within the document.
    • GetPageString() returns the portion of the printed page number determined by the <$curpagenum> building block. (In my experiments, redefining the Current Page # variable did not impact the value returned by this function.)
    Each function is called on the active document. The string printed in the FrameMaker console reflects the values associated with the page currently on the screen.

    var doc, pageNum, pageString;
    doc = app.ActiveDoc;

    function GetPageNumber(doc) {
        var page = doc.CurrentPage.PageNum;
        return page;
    }

    function GetPageString(doc) {
        var pageStr = doc.CurrentPage.PageNumString;
        return pageStr;
    }

    pageNum = GetPageNumber(doc);
    pageString = GetPageString(doc);

    Console("Offset in pages from start of document is " + pageNum);
    Console("Page number that appears on printed page is  " + pageString);

    The following output illustrates the fact that each of these functions likely returns a different value for the same document page even accounting for the difference in value type.


    Page Types

    FrameMaker employs four different page types. Three of these will be familiar to end users of FrameMaker:
    • Body pages (FO_BodyPage)
    • Master pages (FO_MasterPage)
    • Reference pages (FO_Reference Page)
    A fourth page type is the  hidden page (FO_Hidden). There is only one such page and it holds hidden conditional text. While users cannot access this page, FDK plug-ins and scripts can.

    There is no generic FO_Page object.

    Body, master and reference pages can be made visible on the screen while hidden pages cannot be viewed in this manner.

    NOTE: It is possible for a script to work with object on pages that are not currently displayed on screen.

    Wednesday, November 16, 2011

    Creating a Variable

    Variables fall into a category anchored formatted object. Tables and cross references also belong to this group. They are similar to anchored objects (markers) but creating them requires that you specify a format as well as an object type and text location.

    In the case of variables, the format is simply the name it is know by in the user interface. You can view a list by using the  Special>Variables command from the FrameMaker menu bar.


    The following script adds the Current Date (Long) at the start of the first paragraph in the main flow.

    var doc = app.ActiveDoc;
    var flow = doc.MainFlowInDoc;
    var tFrame = flow.FirstTextFrameInFlow;
    var pgf = tFrame.FirstPgf;

    function createVariable(doc, pgf, offset, type, format) {
        var tLoc, variable;
        tLoc = new TextLoc(pgf, offset);
        variable = doc.NewAnchoredFormattedObject(type, format, tLoc);
        return 1;
    }

    createVariable(doc, pgf, 0, Constants.FO_Var, "Current Date (Long)", "Index");


    Tuesday, November 15, 2011

    Creating an Index Marker

    Markers are an instance of anchored objects. As anchored objects they are tied to a text location. Creating a marker means specifying a paragraph and an offset from the start of that paragraph. You also need to provide the same information a user might when creating such a marker. That means you must specify:
    • The marker type
    • The marker text
    Use the same type name as appears in the user interface in the Marker Type pop-up menu. The marker text must also mirror that a user would enter.

    The example below creates an index marker at the start of the first paragraph in the main flow.


    var doc = app.ActiveDoc;
    var flow = doc.MainFlowInDoc;
    var tFrame = flow.FirstTextFrameInFlow;
    var pgf = tFrame.FirstPgf;

    function createMarker(doc, pgf, offset, type, text) {
        var tLoc, marker;
        tLoc = new TextLoc(pgf, offset);
        marker = doc.NewAnchoredObject(Constants.FO_Marker, tLoc);
        marker.MarkerType = type;
        marker.MarkerText = text;
        return 1;
    }

    createMarker(doc, pgf, 0, "Index", "animal:aardvark");

    Sunday, November 13, 2011

    Creating a New Paragraph

    While paragraph formats have names, paragraphs do not. They fall into a class known as series objects. A series object is any object, other than graphic object, that occurs in an ordered list. Pages and book components are also series objects.

    Call NewSeriesObject() to create a paragraph or other series object. As series objects are part of ordered lists,you need to specify the type of object to create and the identifier of its predecessor in the list.

    If you want the new paragraph to appear at the start of the flow, specify the flow object for its predecessor. For other objects, specify 0.

    //add a paragraph at the start of the specified flow
    doc.NewSeriesObject(Constants.FO_Pgf, flow);


    //add a paragraph after the paragraph specified
    doc.NewSeriesObject(Constants.FO_Pgf, pgf); 
    W9ACUGJMJ4Y9

    Updating Paragraph Format Properties Using Property List

    Once you have created a paragraph format (or other named object), you very likely will want to modify the default properties automatically set when the object was created. You could do so one at a time but this can be tedious. It can also be hard to figure out just the right values for each property.

    If your new format is similar to that of an existing format, you can use the properties of the existing format as a starting point. You can then explicitly set only those properties that are different.

    This example bases a new (or existing) format on an existing paragraph format. It changes only the underlining property.

    This script relies on the GetProps() and SetProps() methods which work with the properties of an object as a group.

    NOTE: You can base the properties of a new paragraph format on those of a paragraph. This is the case even though the sets of properties do not exactly line up. Any mismatches are ignored.

    The following function was called with:
    createPgfFmt(doc, "Heading0", "Heading1")

    /* Create or update a paragraph format with the name "newName". Set the format properties based on those of the "basedOnName" format. Change the underlining to be single.
    */
    function createPgfFmt(doc, newName, basedOnName)
    {
    //determine if the format already exists
    var newPgfFmt = doc.GetNamedObject(Constants.FO_PgfFmt, newName);
    if (!newPgfFmt.ObjectValid()) {
    //create it if necessary
    var newPgfFmt = doc.NewNamedObject(Constants.FO_PgfFmt, newName);
    if (!newPgfFmt.ObjectValid())
    return(0);
    }
    //get the based on format
    var existingPgfFmt = doc.GetNamedObject(Constants.FO_PgfFmt, basedOnName);
    if (!existingPgfFmt.ObjectValid())
    return (0);
    //Get all properties of existing format
    var props = existingPgfFmt.GetProps();
    //find underlining in the array of properties
    var index = GetPropIndex(props, Constants.FP_Underlining);
    //update the underling value
    props[index].propVal.ival = Constants.FV_CB_SINGLE_UNDERLINE;
    //update the new format's properties to match the old, save for underlining
    newPgfFmt.SetProps (props);
    return(1);
    }


    Friday, November 11, 2011

    Creating a new Paragraph Format

    Paragraphs are, in FDK parlance, named objects. Use the NewNamedObject() to create one. Pass in the type of object and the name you wish to use.

    var doc = app.ActiveDoc;
    pgfFmt = doc.NewNamedObject (Constants.FO_PgfFmt, "My Fmt");

    The newly created format has default properties.


    You can create a long list of objects the same way including colors, condition formats, and character formats. (Look for the Name property.)

    Wednesday, November 9, 2011

    Deallocating Text Items

    The short answer is you don't need to if you are using the ESTK. Read on for the full saga.

    The first words that came into my head when I learned about the ExtendKit toolkit for FrameMaker were garbage collection. Writing FDK programs is (mostly) a lot of fun but figuring out how to correctly allocate and deallocate memory is tricky and error prone. JavaScript purports to free one from those complexities.

    So I was a bit surprised to see that the Scripting Guide documentation for GetText() and methods such as GetProps(), Save() and others contain notes that are similar to that shown below.
    "Note: The returned TextItems structure references memory that is allocated by the method. Use the DeallocateTextItems() method to free this memory when you are done with using it."

    So apparently memory management is still something script writers must contend with.

    If you call GetText(), do you absolutely need to call the DeallocateTextItems() method to free the memory used when you are done? If you are getting a small number of text items, you are very likely safe if you forget or don't bother to deallocate. But if you call GetText() on a large quantity of text (possibly in  many documents), failure to deallocate can be a problem. This is also the case if a script might be called many, many times before FrameMaker is restarted.

    The FDK has the F_ApiBailOut() command which purports to direct a plug-in to stop running and give back its memory when it completes a command. I was never confident this did anything on Windows and there appears to be no analog in ExtendScript. Only Adobe knows how the scripts are implemented at that level. All one can be sure of is that when the user exits FrameMaker, any memory used by scripts is freed.

    So, I tried to be a good citizen and deallocate my text items:

    var tItems = mainflow.GetText(Constants.FTI_CharPropsChange | Constants.FTI_TextObjId |
    Constants.FTI_String);
    PrintTextItems(tItems);
    app.DeallocateTextItems(tItems);//WRONG

    But I ran into a problem. I could not find a single example of the appropriate use of DeallocateTextItems()or the other deallocate methods anywhere. and my attempt to use this function produced the following error:


    What is going on? Is this a documentation error or my error? I have yet to figure this one out.

    Sunday, November 6, 2011

    Viewing Text Items


    Use the GetText() method to work with the content of paragraphs or other objects that contain text. The method takes a single parameter that indicates the type of text items you are interested in. There is a long list of possibilities. See the Scripting Guide for full details. The method returns an array of text items.

    The example that follows request text items in the main flow and request the following item types:
    • Indicators of places where the character properties of the text change. (FTI_CharPropsChange)
    • The identifier of the paragraph or text line to which the offset of each text items in the array is calculated. (FTI_TextObjId)
    • The strings that make up the text. (FTI_String)
    Why is it important to know the identifier of the object containing the text? While the code queries the flow, making any changes requires knowing the identifier of the paragraph (or text line) in which the text resides.

    What about the text strings? If I run my script on a paragraph that has no changes to character properties will I get a single string? The answer is maybe. The FDK has a string limit size of 255 so no string will be larger than 255 characters. But, there is no guarantee that the text items will have the largest supported string size consistent with the information requested. In fact, if you call GetText() on a file that has been heavily edited, it is likely that you will get back a number of smaller text strings. There may be other reasons for this phenomenon that are not apparent to those not privy to the internal workings of the FrameMaker product. In short, GetText() gives you all of the text strings in their order of appearance but there is no guarantee that the number of text items is minimal.

    Imagine that GetText() is run, as shown in the code that follows, on the document below. The call is followed by a request that the text items found be displayed in the FrameMaker console.

    NOTE: The constant values or OR'd to produce the appropriate flag parameter.

    var tItems = mainflow.GetText(Constants.FTI_CharPropsChange | Constants.FTI_TextObjId |
    Constants.FTI_String); 
    PrintTextItems(tItems);

    The file


    The text items


    The first number displayed is the offset from the paragraph start. In the case of FTI_TextObjId, you see the actual object identifier. In the case of FTI_CharPropsChange, the hex value indicates the type of change that took place. FTI_String items are followed by the actual string text.